A Beginner’s Guide to Wild Camping Gear
Camping without the right equipment has a high likelihood of deteriorating into a soggy endurance test with increasingly miserable snack breaks, so let’s take a look at the basic gear you’ll be needing for a comfortable and enjoyable trip, because there are so many options these days that it can be totally bewildering to beginners.
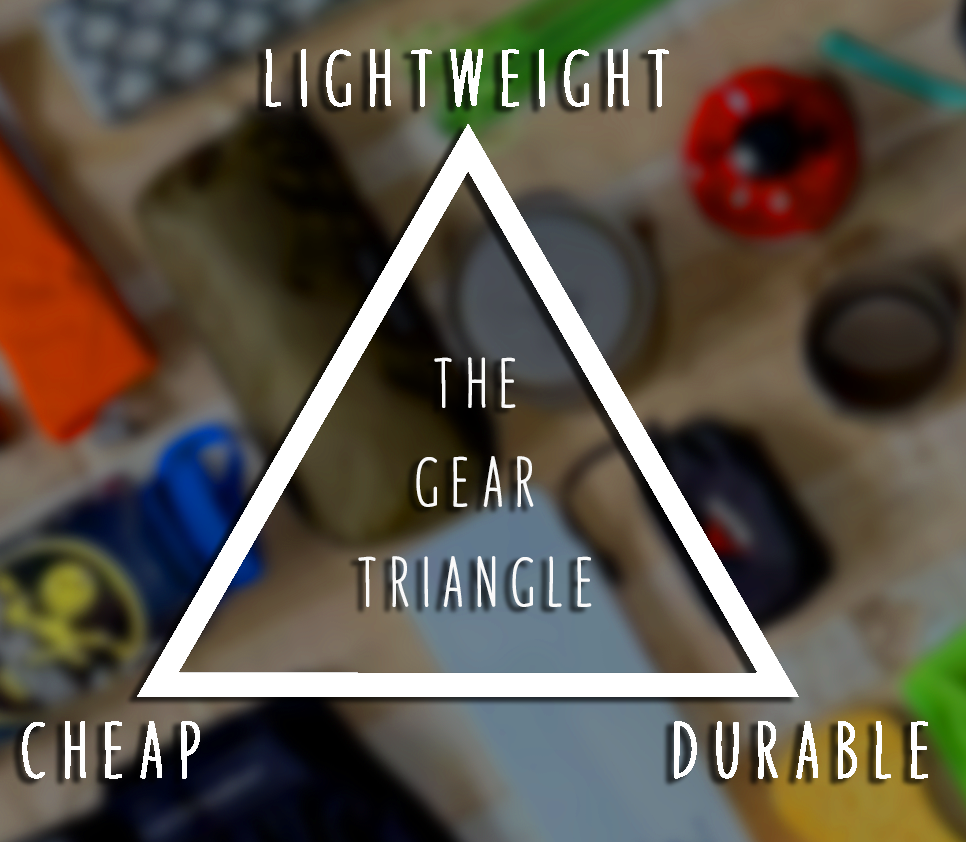
Something to be aware of when buying hiking and camping equipment is that there’s a sort of “gear triangle” to bear in mind; basically, when it comes to buying stuff, you can generally only really get two out of these three criteria:
- Lightweight
- Cheap
- Durable
What this means is that, for example, you might get something that’s durable and cheap, but the tradeoff for that is that it’s not likely to be lightweight. Very cheap tents and backpacks often match this description. Or, you may get something that’s lightweight and cheap, but it’s unlikely to be very durable; again, there are many tents, especially on Amazon or AliExpress, that are like this. Or you might have something that’s durable and lightweight, but that’s not going to be cheap. You’re very likely to have to make some compromises when purchasing, based on budget and needs.
Weight is a particularly important consideration for a lot of campers, and broadly speaking, light and ultralight gear that’s actually going to last a long time is usually the most expensive available.
Whether you decide to start with basic equipment with a view to potentially upgrade as you go out on more and more adventures, or whether you decide to invest in more expensive gear from the beginning is a personal choice. It’s good to know that there’s a decent market for used gear, so it’s relatively easy to sell on gear when you upgrade. Or, alternatively, you can start with used gear from eBay or elsewhere, as buying secondhand often means you can buy slightly nicer stuff to begin with.
Let’s look at the main items that you’re probably finding an overwhelming array of options for.
SHELTER
The first thing most new campers will be looking for is a reliable shelter. Most folks prefer a tent, although bivvy bags, which are waterproof bags you put over your sleeping bag to allow you to sleep directly under the stars, are a minimalist, lightweight alternative. We’ll focus on tents here, as bivvying may be the lightest weight approach but can be a bit like being thrown in at the deep end, as you’re more exposed to the elements and this can be intimidating for newcomers.
THREE SEASON OR FOUR SEASON?
Firstly, consider what seasons you’ll be camping in. You get three season tents, which are designed to be suitable for spring, summer and autumn, and four season tents which, despite their name, are actually only really ideal for one season: winter.
The main differences between three and four season tents are generally strength and ventilation. Let’s look at the reasons for these.
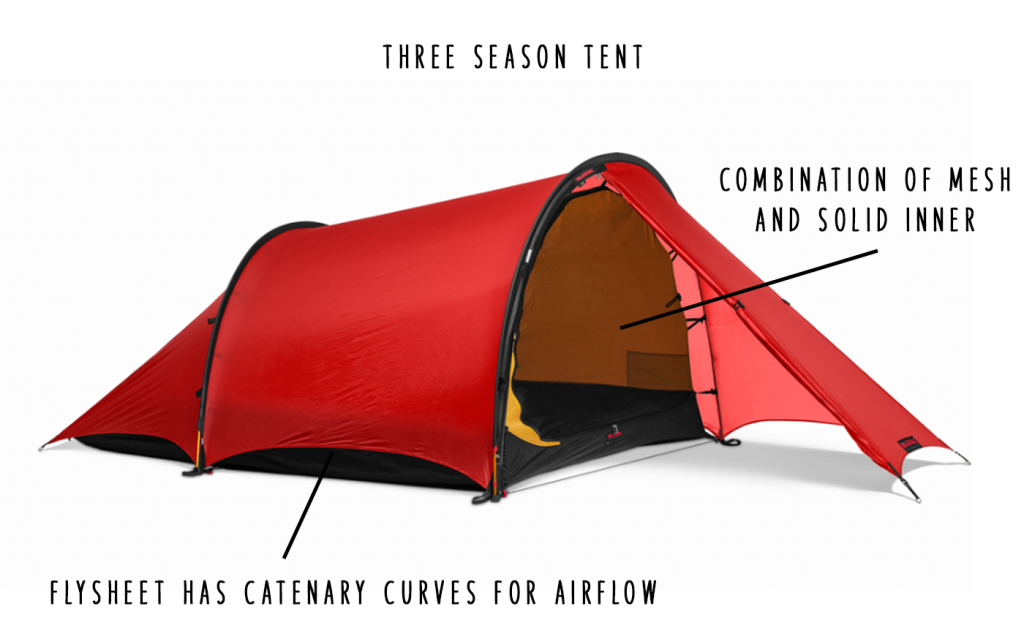
Three season tents usually have catenary patterning on their flysheets; this means the bottom of the flysheet is arched to allow plenty of air to enter and circulate around the inside of the tent. They also tend to have partial or entirely mesh inners to additionally aid airflow and keep the inside of the tent cool.
Most of the “ultralight” American brand tents (eg Durston, Hyperlite, Nemo) fall into this three season category, and in fact American tents generally tend to have better ventilation than European tents.
In terms of strength, three season tents can often be made out of lighter weight fabrics, as it’s assumed they’ll be used in fairer weather, thus requiring less strength, not only for lesser winds, but also because they don’t have to deal with snow.
Whereas, it’s assumed that four season tents will be used in snowy conditions, so additional strength is needed for snow-loading; ie the weight that snow places on a tent when it falls and accumulates on top of it. For this reason, four season tents usually have thicker poles and fabrics.
These tents, in contrast to that curved design that three season tents have, have flysheets which extend all the way to the ground to block cold draughts and spindrift (snow drifts blowing in). Thicker fabric in the flysheet assists with this snow-loading and potentially stronger winds, while thicker poles (almost always aluminium) additionally provide strength and structure to deal with snow-loading. Their inners tend to be solid fabric instead of mesh, to allow more heat to be trapped inside. The reason they’re not ideal for warmer weather camping is because these flysheet and inner features generally mean that they have less ventilation than three season tents.
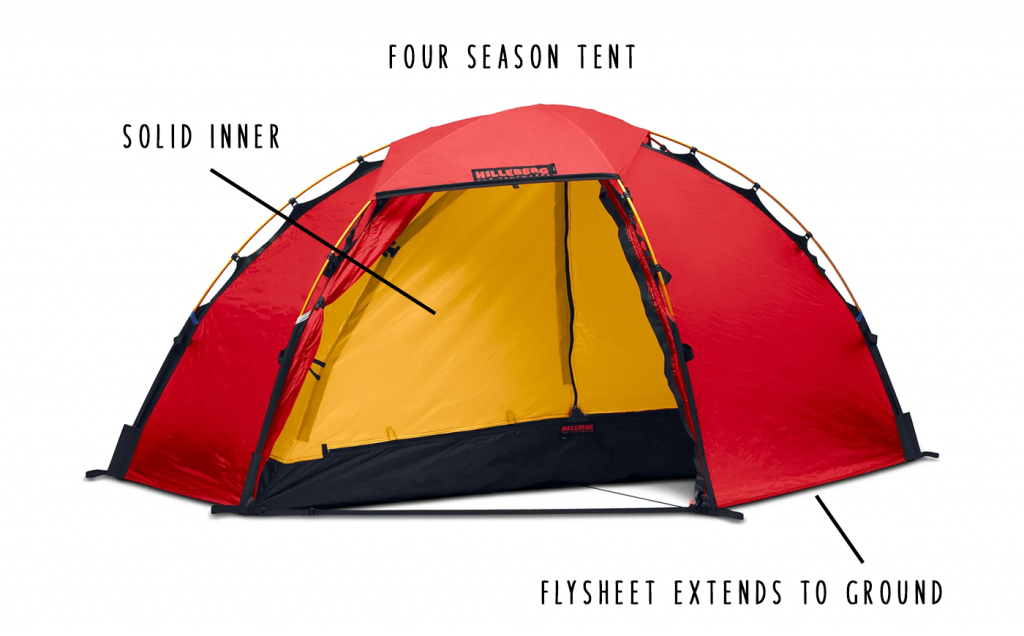
Unless you’re the type of camper who heads out in blustery, snowy weather, a three season tent should be enough for your needs.
⚠️ It’s worth mentioning that “four season” has become has become a bit of a tent buzzword and there are a lot of cheap tents for sale on Amazon and other non-outdoors sites that claim to be four season when they aren’t. The main features to look for are that flysheet that extends all the way to the ground to block spindrift and draughts, and strong, generally aluminium poles that are at least 9mm thick. If it doesn’t have these features, it’s probably not winter-worthy.
SIZE AND WEIGHT
Secondly, what size tent should you get? There’s a sort of agreed notion that you should always get a tent sized for one more person than you’re actually going to be using it for; ie if you’re planning on solo camping, you should get a two person tent, and if you’re planning on camping as a pair, then you should get a three person tent, and so on. But you should carefully consider whether you’re willing to carry that additional weight, or whether you’re okay with a snug fit inside the tent. This is an entirely personal choice.
When it comes to weight, there’s a large spectrum, and it’s not quite as straightforward as “cheap tents are heavy and expensive tents are light” because it comes back to that aforementioned gear triangle, and what you’re willing to compromise on. Generally anything above 2.5kg-3kg would be considered a relatively heavy tent; however, a lot of high end four season tents come in around this weight and even higher, because they’re extremely strong.
DIFFERENT DESIGNS
Another consideration for tent choice is what style of tent to get. A lot of people get quite hung up about having a free-standing tent, which is essentially a tent that doesn’t strictly require pegging out in order to be pitched. These can be useful in certain situations where the ground may be very difficult to peg, like very rocky ground. However, freestanding tents are often amongst the heaviest tents, as they usually require at least three poles.
It’s also worth bearing in mind that even with truly freestanding tents, it’s best to still pitch them using their guy lines and pegs, as this ensures your tent is taut and doesn’t sag, which can exacerbate condensation. Freestanding tents are usually dome-shaped, with a geodesic pole structure, or two crossing poles with an additional shorter pole suspended along the top. Examples of free-standing tents are the Hilleberg Soulo, the Hilleberg Allak, the Durston X-Dome, the Terra-Nova Vault Duo, and the Fjallraven Dome.
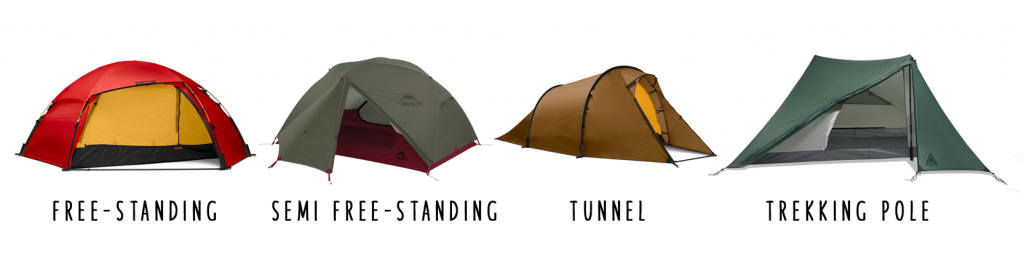
Semi-freestanding tents are similar to freestanding tents in that they can be mostly pitched without the need for guy lines, although their vestibules require pegging out. They’re usually dome-shaped, with two crossing poles, with an occasional third pole for structure above the entrances. Examples of semi-freestanding tents are the MSR Elixir, the Wild Country Helm, the Big Agnes Copper Spur and the Big Agnes Fly Creek, and the Hilleberg Niak.
Tunnel tents are named as such because of their tunnel-like shape. These tents generally offer the best space-to-weight ratio, and contrary to popular belief, actually handle wind very well if pitched properly parallel to it. Their design also means they’re usually very quick to pitch, as you’re usually just sliding 2-3 poles into sleeves, without having to clip things into place. You get them in all sizes from 1P and up, although single person tunnel tents usually only have a single pole. Examples of tunnel tents are the Hilleberg Nallo, the Vango Banshee, the Fjallraven Abisko Lite, the Terra Nova Laser Lite and the OEX Phoxx.
Trekking pole tents are particularly popular with ultralight backpackers doing long distance trails, but have seen increasing popularity over the past few years. To save weight, these tents use your trekking poles instead of having their own poles. They’re usually ridge or pyramid-shaped, and because they’re most often made by ultralight specialist manufacturers who prioritise weight over strength, most trekking pole tents are not suitable for extreme weather conditions, although they’ll usually handle some blustery conditions reasonably well. Examples of trekking pole tents are the Durston X Mid, the 3FUL Lanshan, the Tarptent Stratospire and Dipole, the Hyperlite Mountain Gear Unbound and various pyramid tents, and the Hilleberg Anaris.
HYDROSTATIC HEAD
The UK is pretty rainy, and because of that, we should pay close attention to the hydrostatic head rating of tents. Hydrostatic head is measurement of how much water a tent can handle before the water penetrates the fabric, and is measured in millimetres. The higher the number, the more waterproof the tent; anything under 1500mm can’t really be considered properly waterproof for our weather.
Bear in mind that higher hydrostatic head values are required for equipment that comes under pressure; because of this, whilst a tent’s flysheet can have an HH of around 2000, the floor requires a significantly higher HH because of the pressure on it from the weight of the campers within. For true peace of mind, a floor of at least 10,000mm is preferential for very wet weather.
A NOTE ABOUT CONDENSATION
You’ll often see people asking about condensation with regard to tents. Let’s get something straight: condensation is part of tent camping. There’s no such thing as a tent that magically never has any, because condensation is due to atmospheric conditions. Ideally you should always aim to have some airflow around your tent, and choose your pitch accordingly. Most tents will have a particular way that they should be pitched in order to maximise airflow through its ventilation features, so check your tent’s instructions for these details.

Condensation occcurs when the ambient air temperature drops below the dew point. This dew point differs from day to day and place to place but can usually be found in detailed forecasts. When the temperature drops below this point, air vapour condenses to liquid; this is why we get dew on the grass in the mornings, and why our tent’s flysheet has dew on it too.
Throughout the night, you’re also breathing inside your tent, and that vapour rises and evaporates through the fabric of your tent’s inner. However, because there may now be moisture on the outside of the tent in the form of dew, this inhibits and slows the fabric’s ability to evaporate the moisture from inside, and this is why the inside of your flysheet is likely to be damp when it’s very dewy outside. The best way to deal with this is to bring a sponge (the Spontex ones work particularly well) or microfibre cloth. Those “Swedish cloths” also work very well.
While condensation is primarily due to atmospheric conditions, it’s worth mentioning that some tents do nevertheless deal with condensation better than others. I mentioned earlier that many American (double skin, not hybrid or single skin) tents are particularly good with ventilation, and therefore tend to be less prone to significant condensation. A lot of European tents, on the other hand, notably Hilleberg tents, tend to suffer a little more with condensation, especially on the inside of the flysheet. But any tent can accumulate moisture overnight given the right conditions, so always have that sponge or cloth in your pack.
TENT BRANDS TO CONSIDER
Entry level: OEX, Naturehike, Vango, Alpkit, 3FUL
Mid-range: MSR, Big Agnes, Nordisk, Durston, Sierra Designs
High-end: Hilleberg, Tarptent, Fjallraven, Terra-Nova, Hyperlite Mountain Gear, Bonfus
RUCKSACK
Your rucksack is a crucial piece of your gear, not only because you’ll need to be able to fit all your stuff into it, but also because it needs to fit your anatomy properly and feel comfortable for carrying that load on a trail, potentially all day. An uncomfortable backpack can really ruin your trip.
Very broadly speaking, very cheap backpacks, like all those random Chinese brands on Amazon and pretty much anything sold by non-outdoors shops like Argos, totally suck. Consider looking for a used one if your budget can’t stretch to something decent new.
What to consider:
- Capacity: 40–60L is typical for wild camping trips, with 40L being an option for folks with a lot of ultralight gear, and 60L+ being more suitable for gear that doesn’t necessarily fall into the ultralight spectrum.
- Fit: Get one that fits your back length and body shape. If you can, go to an outdoor shop that does backpack fittings, as this will help.
- Features: Look for good hip belts, adjustable back systems, and external pockets for stuffing wet socks into. If your gear is pretty heavy (eg 8kg and up), you’ll almost certainly want a pack that has load lifter straps; these are additional short, adjustable straps between the main shoulder straps and the pack itself, that allow you to pull the top of the pack closer to your body.
Try it with weight before you buy if possible. Ideally aim to get your rucksack after you’ve bought your other bulky items (tent, sleeping bag), so that you’re sure your gear will fit.
Broadly speaking, unless you’ve already invested in a lot of expensive ultralight gear or you pack with very little (eg you do mostly bivvy camps in the summer), you’ll most likely need a backpack that’s at least 60L in size.
RUCKSACK BRANDS TO CONSIDER
Entry level: Decathlon Forclaz, Eurohike, Trespass, some Osprey entry level models
Mid-range: Osprey, Deuter, Gregory, Exped
High-end: Hyperlite Mountain Gear, Atom Packs (UK), Zpacks, Granite Gear
SLEEPING MAT
Mats prevent you from feeling every lump under your tent. They also, crucially, keep your body from losing heat to the cold ground. This last bit is very important and should be a significant factor in your purchase; if you’re planning to camp all year round, you’ll need to ensure your mat is sufficiently warm for this. More info in the Insulation section below.
TYPES OF MATS
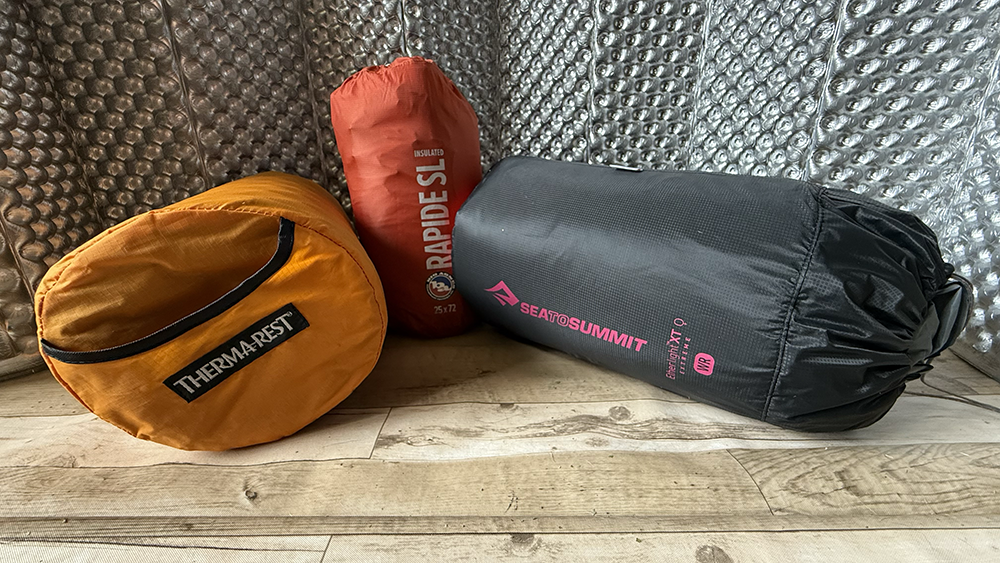
The most commonly used for wild camping are inflatable mats, and closed cell foam mats. Note that self-inflating mats tend to be quite heavy, relatively thin and aren’t ideal for wild camping because of this.
Closed cell foam mats – made from thin foam, don’t provide a lot of comfort or warmth, but do weigh very little and are virtually indestructible. They’re also cheap. A lot of campers use closed cell foam mats underneath inflatable mats during the winter for extra warmth.
Inflatable mats – provide more comfort and more warmth that foam mats, and weigh, on average, anywhere from 400g to 800g, come in a variety of thicknesses and widths. Generally speaking, if you’re a side sleeper, you’ll want a relatively thick mat (8-10cm).
INSULATION
Sleeping mats usually have an “R rating”; this is a rating of how much they’ll insulate you, so the higher the number, the warmer it’ll keep you.
- Summer camping? R 1–2
- Spring/autumn? R 3–4
- Winter? R 4+ or pair two mats together, as R ratings do stack.
- Extreme cold, such as Scottish summits or polar trips? R 6 and up.
If you’re wanting to avoid owning multiple mats, ideally go for something with a rating of R4.5 or higher, but remember this means you’ll be packing a slightly heavier, bulkier mat than is necessary for some of the year. It won’t make you overheat though, so don’t worry about that.
DESIGN
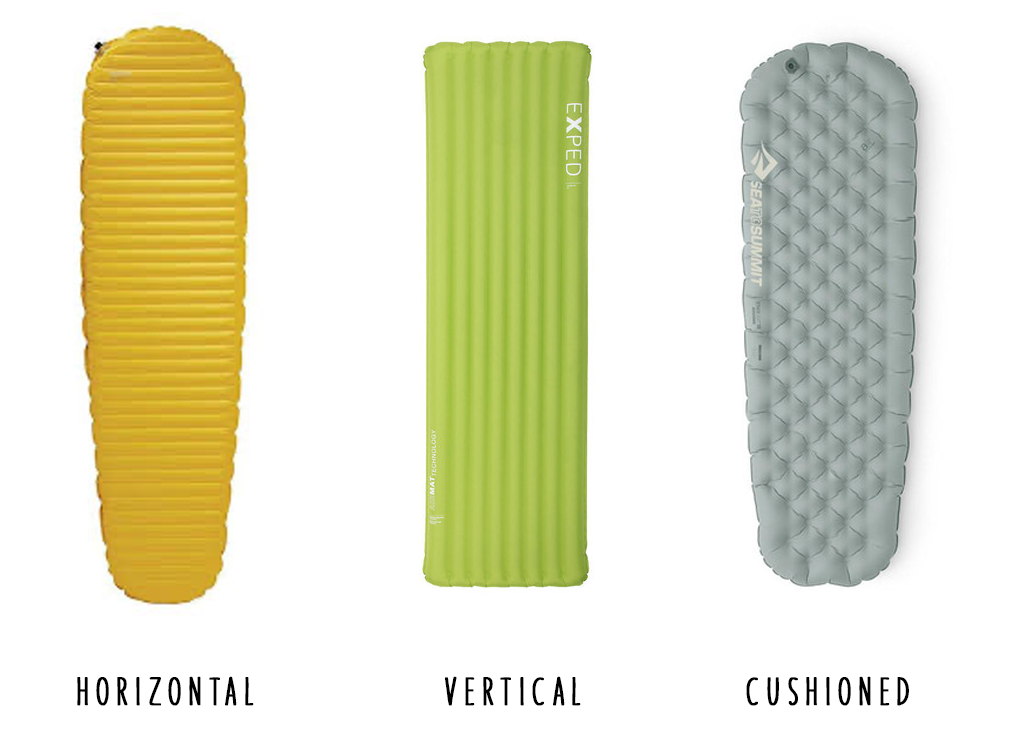
You’ll notice that inflatable mats have different design structures, which have different benefits.
Horizontal baffles – eg Thermarest NeoAir. Ideal for back sleepers.
Vertical baffles – eg Exped Ultra. Good for side sleepers.
Cushioned/quilted surface – eg Big Agnes Rapide, Nemo Tensor. These feel the most like regular mattresses, and occasionally have raised side baffles to prevent the sleeper sliding around.
To inflate mats, you can either inflate them yourself with your own lungs, or, more conveniently use a pump sack (many brands will come with their own) or a small battery-powered pump, of which there are many available.
SLEEPING MAT BRANDS TO CONSIDER
Entry level: Forclaz (Decathlon), Naturehike, Klymit, Alpkit
Mid-range: Sea to Summit, Exped, Rab, Big Agnes
High-end: Thermarest NeoAir series, Exped Ultra series, Nemo Tensor series
SLEEPING BAG OR QUILT
Sleeping bags and quilts are your bedding in the outdoors. In the camping world, quilts are not the same thing as the ones your grandma made; they’re usually very lightweight blankets filled with down (or more unusually, synthetic filling), as an alternative to sleeping bags.
Sleeping bags and quilts come with temperature ratings. Occasionally a manufacturer won’t give the item a temperature rating, in which case I’d caution that the item is probably only suitable for very warm weather camping.
You’ll notice that bags and quilts usually have three ratings: a comfort rating, a limit rating, and an extreme rating. It’s very important to understand what these mean:
Comfort rating: The lowest temp at which a cold sleeper is likely to stay warm.
Limit rating: Where a warm sleeper will get through the night but probably won’t sleep that well.
Extreme rating: Technically alive, but not having fun. Ignore this one.
⚠️ Very important: the thermal ratings of a sleeping bag are made on the assumption that you’re using an appropriately rated sleeping mat.
Always buy for the comfort rating, and even then, use it as more of a rough guide than gospel. If you camp all year round, it’s practical to consider owning at least two sleeping bags; one for the warmer months, and one for the colder months.
DOWN OR SYNTHETIC?
In addition to sleeping bag thermal ratings, the other main choice to consider for your sleeping bag is whether to go with down or synthetic insulation.
Synthetic bags tend to be cheaper, but are also heavier and bulkier, often significantly so, than down bags, which are far more compressible and lighter weight for the warmth they provide.
A common argument against down bags is that down loses its thermal ability if it gets wet. It’s worth mentioning that in an entire lifetime of camping, I have never, ever had a wet sleeping bag; that’s not to say it never happens to anyone, but more an illustration of the fact that the chances of your bag getting wet, provided you’re sensible, are so remote that this shouldn’t be a consideration when shopping for a sleeping bag. As long as you use a rucksack liner or keep your sleeping bag in a dry bag, there’s no reason why your sleeping bag should get wet during a hike. Furthermore, many modern down sleeping bags use hydrophobic down, which does resist moisture to some degree.
Condensation may cause slight dampness on your bag, especially near the footbox when it may come into contact with your tent inner, but this usually evaporates very quickly in the morning.
QUILTS
Some people find sleeping bags restrictive, especially people who tend to sleep on their sides. Quilts may be a better option for these sleepers. They also have the advantage of being considerably lighter and less bulkier than sleeping bags, although they’re also usually a lot more expensive, especially for ones that are rated down to cold temperatures. Some quilts are simple rectangular blankets whilst others may have features like sewn-in footboxes and straps to connect them to your sleeping mat.
SLEEPING BAG LINERS
A lot of companies make fleecy or silk liners to use inside your sleeping bags. Most are simply a sort of sack shaped bag that you wriggle into before getting into your sleeping bag, while some may have additional features like a drawcord opening on the footbox for ventilation. Most of them make somewhat outlandish claims about how much warmth they’ll add to your sleep system; take these with a pinch of salt. Although they do add a layer of cosiness and at least some warmth to your bag, while also providing an extra layer of protection for your sleeping bag (ie keeping it cleaner).
SLEEPING BAG AND QUILT BRANDS TO CONSIDER
Entry level: Vango, Mountain Warehouse, Quechua, Snugpak, OEX
Mid-range: Rab, Sierra Designs, Sea to Summit
High-end: Western Mountaineering, Mountain Equipment, PHD, Rab Mythic series, Enlightened Equipment quilts, Hyperlite Mountain Gear quilts
STOVE
Unless you’re a Rambo wannabe, chances are you’ll want a warm meal at the end of the day and a decent brew. For this you’ll need a small stove, and the types you may consider are:
Gas canister stoves: Easy, clean, pretty reliable. They use a butane/propane mix that comes in various sized canisters. They don’t like the cold very much, so if you’re camping in temperatures below zero, keep your canister warm (stuff it into your sleeping bag with you) or buy special winter-performance fuel.
Some, like the Jetboil, have an integrated pot system whilst others are simply a small cooking head that attaches to a gas canister. The integrated ones are usually a lot heavier than a small stove and separate pot setup, but the trade off is that the integrated ones are sometimes more fuel-efficient.
Examples: MSR PocketRocket, Jetboil, Soto WindMaster
Alcohol stoves (meths/denatured alcohol):
Ultralight, quiet, and simple. But slow (you could potentially be waiting up to 10 minutes to boil water) and not windproof, so bring some sort of wind shield.
Examples: Trangia, Toaks Spirit Burner, XBoil, Vargo
Multi-fuel stoves: These burn petrol, diesel, or anything vaguely flammable. Great for long expeditions and particularly reliable in extreme conditions, but overkill for a weekend in the hills. Require a little more care and maintenance, and usually requires priming before use.
Examples: MSR WhisperLite, Primus OmniFuel, Optimus Nova
STOVE BRANDS TO CONSIDER:
Entry level: Trangia, Coleman, BRS
Mid-range: Soto, MSR PocketRocket, Primus, some JetBoil models
High-end: MSR (WhisperLite International), Jetboil, Optimus (Polaris)
Final Thoughts
Test your gear before heading into the wild. A test night in the garden or nearby hill could save your weekend.
Don’t skimp on a sleeping mat; your hike back in the morning won’t be much fun if you’ve not had a decent night’s kip.
Cheap gear can work fine in good weather but may fail in adverse conditions.
Most importantly: take your rubbish home, keep a low profile, and leave the place better than you found it.
Happy camping!
Further Reading
I have lots of information for wild campers here on my site!
- Gearing Up For Winter Camping in the UK
 Let’s take a look at the considerations we need to make when choosing gear for a winter adventure in the hills in the UK.
 - Popular Areas for Wild Camping in the UK
 A short overview of some of the more popular and accessible areas for wild camping around the UK.
 - Guide To Wild Camping in the UK
 Let’s talk about where you can camp, how to do it responsibly, and how not to become That Camper™ who leaves a mess and ruins it for everyone else.
 - Dealing With Rough Weather When Camping
 From rains to fierce winds, knowing how to plan and react can make the difference between a memorable adventure and a disaster.
 - Choosing A Wild Camping Location
 Some tips to consider for finding appropriate locations when planning a wild camping trip.
 - Is Solo Wild Camping Safe?
 Feeling nervous about camping alone? Here are some tips to help you get out there.
 - My Summer Camping Gear
 An overview of a typical lightweight camping setup that I’ll use for camping in the hills throughout the summer.
 - Scotland: The Affric Kintail Way
 A journey along the wonderful Affric Kintail Way in the Scottish Highlands.


